Develop a WordPress Theme from scratch — Part 2
On the first part of this 3 parts article - we installed WordPress and registered some important WordPress actions. On this part, we will continue with the implementation of the design and structure of our theme.
You can find the design on part 1.
Index.php file
the index.php file is at the bottom of the WordPress template hierarchy, and each time a request will be made, It will be used to display any content which does not have a more specific template file attached to its URI.
Let’s add to theindex.php file this code
<?php get_header(); ?>

<h1>Index</h1>

<?php get_footer(); ?>
This code is pretty self-explained, the first line gets the header of the theme, the next line just print a title with the word Indexand the third line gets the footer of the theme.
Side Note: since we don’t have a header or footer for our theme yet and we don’t pass any argument to the get_header() and get_footer(), those functions will get the default header and footer of WordPress. You can take a look at the code under the wp-include/general-template.php
At this point, when going to the homepage of our website, the page should look something like this —

As mentioned before, the index.php file will be displayed when WordPress couldn’t find any other file with the matching file name. So every time we will browse to a page, for example — mydomain.com/contactor mydomain.com/abc (where mydomain.com is your website URL) we will see the same content and design of the index.php.
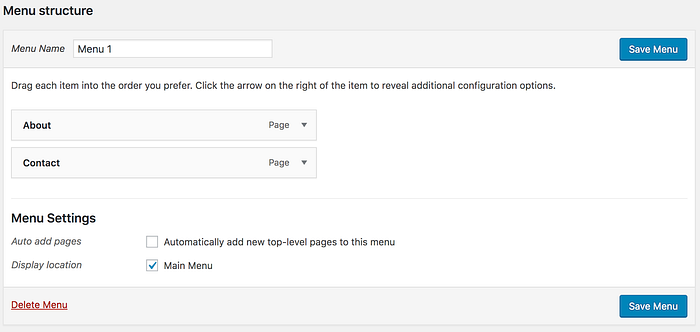
Adding pages and create the main menu
The first thing we need to do is to create the homepage, about, and contact page. Let’s go over to the admin panel and select the Pages tab and add the 3 new pages.

Now, we can go to the customize section and set the homepage as the static front page of our website.

The last thing we will do is creating our main menu. We can do it by going to the Menu section on the admin dashboard, click the create menu button, add the About and Contact pages to the menu set it to Display location: Main Menu and click save.
Adding the stylesheet file
Our website will use some bootstrap styles, but for other things, we will use custom classes. Let’s add this code to the style.css file
/*
Theme Name: my-theme
Theme URI:
Author: Maayan Savir
Author URI: https://dos-commas.com
Description: A simple and classic theme
Requires at least: WordPress 4.9.6
Version: 1.0
License: GNU General Public License v2 or later
License URI: LICENSE
Text Domain: my-theme
Tags: design, classic, simple
*/

body
{
    text-align: left;
    font-family: 'EB Garamond', serif;
}

.main-img{
    height: calc(100vh - 80px);
    width:100%;
}
@media screen and (max-width: 1024px){
    .main-img{
        object-fit: contain;
    }
}
.navbar img{
    width:160px;
    height:45px;
}
.inside-page-main-img{
    object-fit: contain;
}
#ttr_sidebar
{
    border-left: 1px solid black;
}

.menu-item:not(:last-of-type) a:after {
    content: "/";
    margin-left: 10px;
}
.navbar {
    display: flex;
    justify-content: space-between;
}
.navbar-nav{
    flex-direction: row;
}
.nav-link{
    font-family: 'EB Garamond', serif;
    font-style: italic;
}

.form-group span {
    color:red;
}
.form-paragraph{
    font-size:13px;
}
.submit-btn{
    background-color: black;
    color:white;
    padding:10px 20px;
}
Adding Header and Footer
Our design contains a footer with the website logo and the menu. We don’t have a design for the header, but we still need to import some css and script files. So let’s create header.php and footer.php files in our theme folder.
Header File
<html>
<head>
  <title><?php bloginfo('name'); ?></title>  <script src="https://code.jquery.com/jquery-3.3.1.slim.min.js"></script>
  <script src="https://stackpath.bootstrapcdn.com/bootstrap/4.3.1/js/bootstrap.min.js"></script>  <link rel="stylesheet" href="https://stackpath.bootstrapcdn.com/bootstrap/4.3.1/css/bootstrap.min.css">
  <link href="https://fonts.googleapis.com/css?family=EB+Garamond:400,400i&display=swap" rel="stylesheet">
  <link rel="stylesheet" href="<?php bloginfo('stylesheet_url'); ?>"></head>

<body>

<div>
This is a basic header file. We use bootstrap and jquery script files and bootstrap style file. In addition, we use Garamond google font and we link our own custom stylesheet. Also, we use the bloginfo('name') to display our website name as the title.
Footer File
The footer file will be responsible for displaying our website logo and the main menu.
Let’s add function for the website logo part. Inside the functions.php file, add this function.
// get and display the my logo
function mytheme_custom_logo() {
  // Try to retrieve the Custom Logo
  $output = '';
  if (function_exists('get_custom_logo'))
    $output = get_custom_logo();

  // Nothing in the output: Custom Logo is not supported, or there is no selected logo
  // In both cases we display the site's name
  if (empty($output))
    $output = '<h1><a href="' . esc_url(home_url('/')) . '">' . get_bloginfo('name') . '</a></h1>';

  echo $output;
}
This function will try to get the website logo, If nothing will be found we will display the website name as a link to the homepage.
Inside the Footer.php file, let’s add our footer markup
<nav class="navbar fixed-bottom navbar-expand-lg navbar-light">
<?php
mytheme_custom_logo();
?>
<?php wp_nav_menu( array(
'theme_location' => 'main-menu',
'container' => 'ul',
'menu_class'=> 'navbar-nav'
) ); ?>
</nav>
</body>
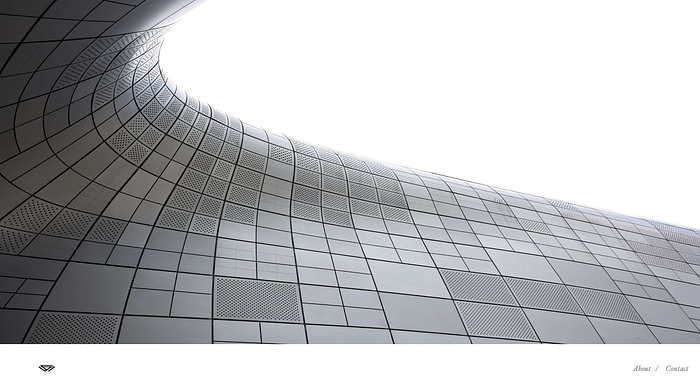
</html>mytheme_custom_logo() is the function we just created, and the second part is a WordPress function to display the menu we created. We use some bootstrap classes. Now we should see our homepage like this

At this point, we can upload our logo and add some style to the links of our menu. To upload a logo just go to cotumize section and upload a logo (under site identity). For styling the alink in the menu, we can add this filter to the function.php file.
// add style class to the a tag in the menu
function add_menuclass($ulclass) {
  return preg_replace('/<a/', '<a class="nav-link"', $ulclass, -1);
}
add_filter('wp_nav_menu','add_menuclass');
Now our homepage should look like this (obviously with your logo image)

Setting the Page template
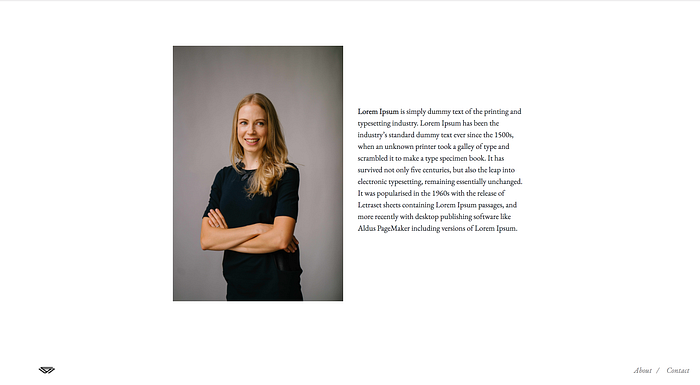
As the WordPress template hierarchy shows, the index.php file is the last in the hierarchy and the one to display if there was no other matching file. So now, for every page (exists or not exists) the index.php file will be displayed. As our design shows, we are planning to display a full-width cover image on the homepage, 2 columns — image and content — on the About page and a contact form on the Contact page.
Let’s start with creating a page.php file under our theme folder. Then we will add this code
<?php get_header(); ?>

<?php $thumb = get_the_post_thumbnail_url() ?>

<?php if ( is_front_page()  ) : ?>

  <div id="content" class="">
    <img class="main-img"  alt="" src="<? echo $thumb;?>" />
  </div>

<?php else : ?>

  <div class="container h-100">
    <div class="row justify-content-center align-items-center">

    <?php if ( have_posts() ) : ?>

          <?php  while ( have_posts() ) : the_post(); ?>

              <!--Display the featured image-->
              <div class="col-4">
                <img class="main-img inside-page-main-img"  alt="" src="<? echo $thumb;?>" />
              </div>

            <!--Display the page content-->
            <?php if($post->post_content!==""): ?>
              <div class="col-4">
                <?php the_content(); ?>
              </div>
            <?php endif; ?>

         <?php endwhile; ?>

      <?php endif; ?>


  </div>

<?php endif; ?>

<?php get_footer(); ?>
Our logic and markup for the website goes like this ->
if the page is the front page, display the home page featured image and add the css class for making it full-width. Else, display 2 columns on the page where on the left the featured image will be shown and on the right, the content of the page will be displayed.
Side note: for design issues, we check if there is any content for this post/page. If there is no content, the featured image should be screen centered
To test it, we can add featured image to any page we have. After we added the images, we can go to the homepage and the about page and see the results.

Now, let’s add some content to the about page. After all, we did set any other page that is not the front page to display the content.
Great!
Now we have set the markup and the structure of our website page templates. If we will go to the contact page, we will see the same markup as the about page but without any image (we haven't set any featured image).
Remember how we said that for the contact page we want to have a contact form? We will go into this on our 3rd and final part of this series.
Hope you enjoyed it. For any questions/ideas please leave your comment.