Getting started with Domain and Hosting for your website
To have a website, you need three things: domain name, web hosting, and a developed website.
Web hosting allow users to create and store content, like a website, on Internet servers.
Domain is a string of characters that give your website an identity. Each website has a domain name that serves as an address, which is used to access the website. Examples of domain name: google.com, medium.com, etc..
Every website most have a Domain and Web hosting.
Getting a Domain
First thing, you will need a domain. You probably already have a name for your website. Let’s say that your website name is my-awesome-website so you would probably want to have my-awsome-website.com (or any other relevant domain ending). To register a domain you can use Namecheap.
There are many places to buy a domain and I have been using some of them until I found Namecheap.
Namecheap is one of the best domain registrars when it comes to balancing price and support.
If you register a .com domain with Namecheap, they’ll also include a WhoisGuard privacy protection for free (protect you from publicly exposing your contact information)
Buying a domain name on Namecheap is super easy, the checkout process is simple and straightforward (and unlike others, they don’t try to upsells you), it’s domain management panel is also simple and intuitive.
They have a 24/7 live chat (and only that — you can’t call them). Their representatives are fast and help you solve any problems or answer any questions you might have.

You can go the their website and search for a name you want (your website name). Once you have found it, add to the cart (create an account if not already have) checkout and pay.
Getting a hosting
The next thing you will need is a hosting. Same as Domain services, there are multiple options for hosting services. In the past years I’ve been working with SiteGround. It has a great customer support, its management panel easy to use and learn, and after using and trying multiple different hosting companies it is well maintained and secure.
Although SiteGround’s basic plan is a bit expensive compare to other companies, it comes with a daily backup (which it is hard to find in low cost hosting services) and with some other perks.

To get started with SiteGround, simply go to their website and choose Web Hosting and chose the StartUp plan. On the next screen, if you already have a domain write it down if not you are able to register a new one (pay attention to the price they asking — highly recommend to stop and purchase a domain through Namecheap).
Once done, complete the purchase form and pay.
At this point, you should have a Domain and Hosting. The only thing left for us to do is to connect between the two services.
For those of you how might want to have a cheaper hosting, you can use Bluehost. If you do, I would recommend choosing the
Choice Plusplan (which is the cheapest one with backup).
Connect your Domain to your Hosting service
Now that we have Domain and Web hosting services we need to make them work together. It means that the Domain service should know where should it redirect anyone how is trying to access you website. This is done by DNS.
The Domain Name System (or DNS) converts human readable domain names (like: www.google.com) into Internet Protocol (IP) addresses (like: 173.194.39.78). Nameservers store DNS records which are the actual file that says “this domain” maps to “this IP address”.
To do so, first we need to find what is our Name server. We can find it on our Web hosting cPanel.
On SiteGround, log in to your account, once logged in chose the Websites tab. you should be able to see your website account (it should have the same name you enter when purchasing the hosting plan). On the right side you will have a button says cPanel, click it.
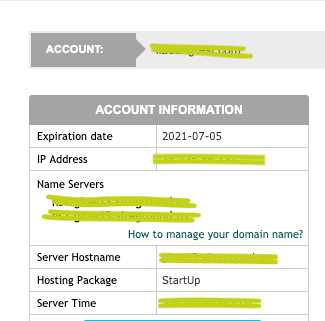
Once you are inside your cPanel, on the left side you will see a box with Account Information title. Inside it you can see you Name servers.
With that in mind, open a new browser tab and login into you Domain server account. We should add those 2 Name servers into our Domain server account.
If you had follow the article and purchased a domain with Namecheap, you can find your domain on the Dashboard tab once you are logged in to your account.
On the right side you will see a Manage button, click it to manage your domain. Once there, search for the section NAMESERVERS .

By default it will be configured to use Namecheap BasicDNS (if you purchased a hosting plan with Namecheap you should leave it as is).
Otherwise, click the arrow to expend the options and choose Custom DNS .
2 new rows should be added for you to add your Name servers.
Past the 2 name servers we copied from our cPanel.
Once done, click on the check mark on the right.

We are done!
It should take some time for the changes to take place.
Meanwhile, you can track it on whatsmydns by simply type your Domain name.